This Christmas Sew A Gold Cork Fabric Make

Wednesday 15 November 2017
 

Hello,

This Summer I designed and stitched these two lovely bags for Minerva Crafts using gold cork fabric. I'm writing this in November as I haven't put this lovely shopper down since! It would make a fab-u-lous gift to make for a friend for Christmas or buy the fabric for your sewing friend!

 
I used the purse bag for holiday but it's too Summery for the Autumn but the shopper is now a must have for my college books, Mummy days and days when I go into town. I can fit so much in it and with the double stitching it pretty strong. You can read my tutorials over on the Minerva Crafts blog.
 
Here are the best three reasons to sew/gift gold cork fabric - 
 
 
It cut just like cotton fabric, no way! And you can use your  everyday sewing scissors on it.
 
 
You can see it with your regular sewing machine and a 100 needle.
 
 
The fabric has a soft handle and you can fold it, pin it and stitch just like a cotton twill.
 
So grab a cuppa and read how to put some sparkle into your Christmas with this pretty gold fabric.
 
Have a great Wednesday,
 
Samantha


My Handmade Holiday Bag 3 months on

Friday 14 July 2017


craft, sew, bag
 
Hello,
 
Welcome to my first post under my new blog name 'Crafternoon Teas', I wanted to re-name my blog with what I love and crafting and tea sounds the best way forward. More on my new blog soon...
 
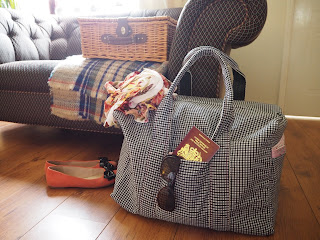
This post, after my blogging break is a look back a my gorgeous holiday bag I made in April. I was over the moon with this bag as it ticked all the boxes of being contemporary, unisex and very practical for family trips. Here's how I got on with it three month later...
 
sew, holiday bag
 
In the last three months we have taken the bag on long weekends, it's been thrown in the back of the car for days out and Mr. Crafternoon has taken it on a cycling trip away. It now lives at the bottom of his wardrobe (his choice).
 
simplicity pattern, sew
 
I love the fabric as it's so easy to wash and the large handles are perfect so you can pop it on your shoulder.  The deep side pockets made without the zip are great for maps and tablets. Being able to make something that works like this is what I love about being able to sew.
 
If I was to make it again I would make it with a heavy duty zip. The pattern didn't specify a heavy duty version but the amount of use it's been getting I would sew one in when I made this again.
 
 
I want to thank Minerva Crafts for supplying the materials and publishing the review on their site. Have you made a bag or want to for you holiday?
 
Happy Sewing,
 
Samantha x


Fabric Meet Birmingham #fmbham Are you there?

Monday 13 March 2017


sew, fabric, meet, sewing, craft
Hello,

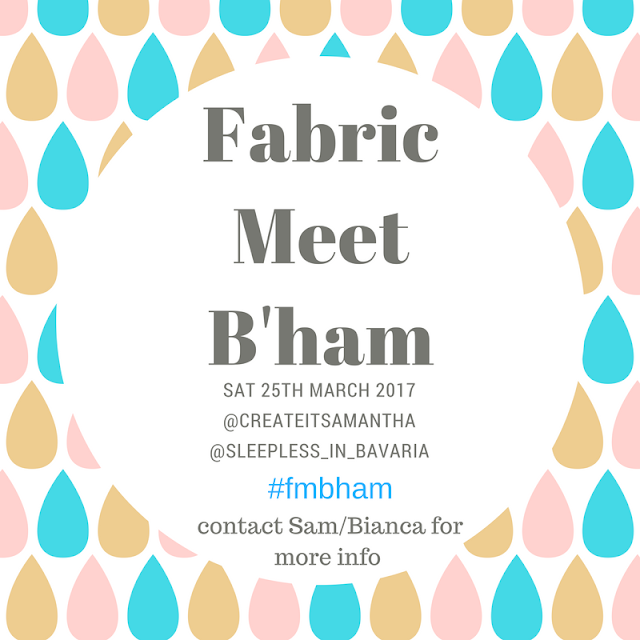
I'm popping by today to invite you to our super-duper fabric meet a week on Saturday. As the seasons are changing (very rapidly), we thought it would be lovely to get together in the middle of the UK and shop for Spring fabrics!

The meet is open to anyone, so you don't need a blog or a huge social media following to come. It's about getting to know other sewing and stitching people, sharing advice and having a very relaxed day out.

If you are interested in coming, please message me at createitsamantha  (at) gmail.com and I can give you all the details. We are looking to go to about 5/6 fabric shops, the event is free but we have some lovely goodie bags so we do need to know numbers before the day.

Have a lovely sunny Monday,

See you at #fmbham,

Samantha x 

How I Wear 1966's Simplicity 6535

Tuesday 31 January 2017
United Kingdom

Hello,
Today I want to share with you my most worn item of handmade sewing from 2016. After spending time sorting and clearing this January, I found quiet a few photos on me in the same dress.
The pattern was from my Gran's stash which I was given when she passed away a few years ago. I felt that I should make it is celebrate all the sewing inspiration she had given me. I have called it my 'Gran dress', it's so easy to wear and you can make it modern with pearls and a swing coat or make it retro with bright tights.
So here is in it's gorgeous old sleeve. I love all the illustrations so much. I made version two without the contrast trim.
sewing, dressmaking, vintage

I made it first for Sew Brum and loved that it went together without any unpicking and resewing. The fabric is a gorgeous crepe I picked up in My Fabric Place . I was lucky to find a turquoise 22in zipper to match which made my day and I thought this dress is meant to be! Gran is looking down at me!

I made this in October 2015 and meet Tilly Button's in it last February ('16) where she had a sample of soon to be released her Martha . The cut and feel is very similar if you want to try and modern pattern with a vintage feel.

For me, I love the darts on the front and the dart on the elbow. Here's a few pictures from the last year..

vintage sewing pattern, blog post
It looks fab with pearls.
dressmaking, sewing, sew
                                            Shopping at #sewbrum with a grey wool swing coat.


sewing, dressmaking

                                                          Christmas 2016 with green beads

sewing the sixties
And it's perfect for picking for little girls!


Happy sewing!

Love,

Samantha xo

I've also just revamped the website so do pop over and Follow my blog with Bloglovin

Make Your Own Marbled Box DIY

Wednesday 25 January 2017


A big trend at the moment is marble. I've designed a marbled wooden box tutorial which you can also create with a wooden box from your local craft store, some nail varnish and paint primer in about 30 minutes. I got the inspiration for my box from Oh Joy! Marble Bead Jewellery. I found the link when looking for crafts for my birthday party last Autumn . It does smell so please dip in a well ventilated space. The effect is immediate and so quick to create.

For this post I've partnered with Parcel Hero to support their online auction for Great Ormond Street Hospital. Parcel Hero are looking to raise £1500 for G.O.S.H. this Christmas, so please do give generously to the link below. Thank-you guy's for sending me the box to DIY and then gifting towards the appeal.

For this DIY, you will need-


- A wooden box with a close fasten clasp (for dipping and the lid staying on!)
- Duck tape
- Three matt nail varnishes
- One glitter nail varnish
- One skewer
- One plastic bowl to dip the box in
- Paint primer or matt undercoat
- Fine sandpaper


Take your box and give it a light sand, Then paint it and let it dry before giving it another coat. When the box is dry tape the edges up with masking or duck tape so they are water tight.


Then it's time to get ready for marbling. Take your plastic tub and fill it half full with tap water and place on a protected surface.


Then add your nail polish starting with the lightest one first. Add a few drops of each and then stir with your skewer. You have to be super quick as the varnish dries really quickly.


Hold the box around the taped sides and dip it. The varnish will stick to the primed painted surface and ta-da it's marbled!


I let the box dry before I peeled off the tape and painted the edged with glitter polish.


And leave to dry before closing.

 
And my box is finished. I really love this technique, it reminds me of marble inks at school.


For other bloggers creations check out the #PHWinterWorkshop  tag on social media. You can read more about the Parcel Hero support of G.O.S.H click  here .

Happy Crafting!

Samantha