Last Day Of Summer 2013

Saturday 31 August 2013
Looking back on the last few months...

As the leaves start to change and the blackberry and apple picking starts, we have to wave goodbye to those Summer days. In the last week the nights have drawn in and by 9pm the sky is dark and the air has a slight chill.

So before we start planning our Autumn / Winter wardrobe, begin to think of Autumn birthdays and Christmas-time, here is a look back at Summer 2013.


This Summer we had a few parties, get togethers and time with our families and friends. After celebrating my Mum's birthday on a very hot day in June, we went to Gloucestershire to celebrate my Mother-in-laws birthday and a farewell party to the farm which they have worked for over 40 years.

Little L crafted a banner to put over one of the farm buildings and we celebrated with gorgeous home-made cakes, local produce and the Wimbledon final.

It will be sad that Little L and her cousin Littler J won't be able to play in the woods and chase around the perfectly kept lawns when they grow up but onwards and upwards and I am sure more pleasures and precious family moments are around the corner.

When the Tour De France was on, we had one of my favourite get togethers of the Summer and celebrated all things French . Our French foodie evening

Celebrating in the garden with French inspired food


A Lancashire celebration with bowls
In August we celebrated another milestone with Crown Green Bowls after a lovely lunch. Have to say the appeal of the bowls was too much for my Little L but she slept all the way home on the two hour journey.

My blogging highlight from the Summer have to be -

 Making Biscuits
oh the fun!


Crafting Fathers Day Cards for the first time. Very special.


Crafting Fathers Day cards

Re-discovering Jewellery Making


My lovely Singer sewing machine


And one final picture..

the simple pleasure of a garden to enjoy with our growing family...
Evening Primroses in the garden 12th July 2013
See you in September for more crafting, family, vintage and more...


Book Review - The Art of the Special Occasion

Sunday 25 August 2013
For any event from a Garden Party to a Wedding ...
This book has the answers...
I first saw  this book in magazines around the time I was planning our Wedding (2009/10.

I had seen Lucia Van Der Post's previous book 'Things I Wished My Mother Had Told Me', when I was a graduate living in London years before our wedding was on the cards. The subtitle attracted me 'Lessons in Grace and Elegance'. 

I love old fashioned polite manners and when the 'Celebrate' book came out I had to buy it for our Wedding planning. And now I use this book all of the time.

Why do I like it so much? It's a really easy book to read, pick up when you are super busy and take snippets out of. The etiquette parts are great too, so you know for a special event that you don't screw up.
I used it to save a small fortune on our Wedding, taking ideas out of the book to make our day unique and special. I have gone on to use it for Christenings, Christmas, Picnics and Garden Parties.
This weekend we are having family over and again the book is out for ideas. Here are a few pictures of the best bits...

The reference pages make it easy to look up exactly what you want to read and quickly.
If you are flicking through, the sections are really clear to find.

The key points of the chapter are bullet points in this gorgeous border with references to the page for more details.


The books goes into lovely detail like for picnics, the type of rugs to take. Details are so important at events and Lucia make the planning all that special.


If you have an event coming up I really recommend this book as it makes the planning simple, fun and oh so elegant! Tried and tested.

This is an independent book review, I have not been paid to write this.

Happy Planning,


The Vintage Pattern Files - lovely blog


Vintage Dressmaking Inspiration


This week I tracked down a stash of vintage haberdashery, after washing and sorting it all out, it feels like a real find. Read more about it in this post.

The old lady had sorted her big buttons and small buttons and ribbons into separate boxes and I could not help but find myself thinking of where all this haberdashery had been used and pre-loved before?


Gorgeous old buttons in all shapes and sizes

More of my vintage pictures from this week on Instagram.

So, I started to look through one of my favourite vintage blogs to find a few patterns to match the haberdashery to a great vintage designs. It's called The Vintage Pattern Files and all the tutorials and patterns are free! Wendy who runs the sites does a fab job of keeping it up to date with more free and some great links too. All your vintage patterns in one place.

Here is just a snapshot of what I found to make the most of my stash -

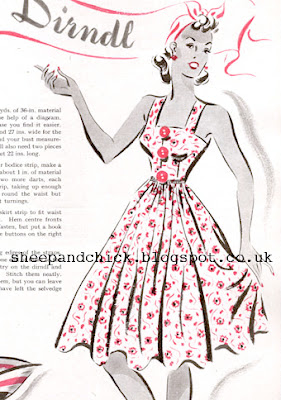
 1940's Day Dresses

Perfect for the late Summer with a great use of those buttons on the front. I love the grey dress gathered detail to give a hour glass shape.

Australian Home Journal 1st September 1949

1930's Summer Beach Dress

This simple dress again in a nipped in waist could make a real feature of those great big fabric buttons I now have in my stash.


 Free Patten 1930's Sewing - Very Easy Dirndl Dress


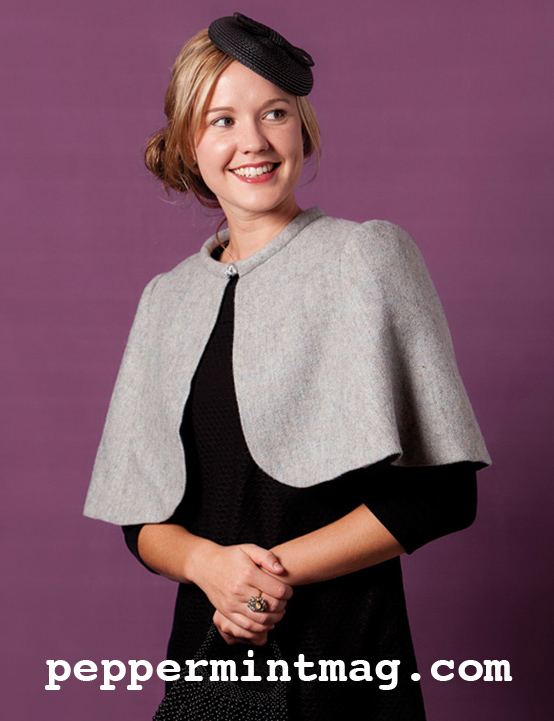
1930's Style Cape

Using a trim and a fastening at the neckline.

Free 1930's sewing pattern - Shoulder Cape

If you have any great Vintage patterns post a comment and a link as I cannot wait to get started.

Happy Stitching,


The Old Lady's Button Box

Saturday 24 August 2013
On Thursday I tracked down these beautiful...

buttons in all shapes and sizes!

I picked up these pre-loved buttons on a chance visit to local village. These will be available to use at my workshops this Autumn.

I got them home and started to sort them out. My, how many! Firstly, I washed all the buttons in hand wash detergent and laid them out on newspaper to dry in the garden. I had my little daughter with me who kind of helped me.

Once dry, I then bought them in and laid them on an old towel just in case any of the metal buttons had water inside them.

The next day, I sorted them out, so far I have filled up eight jam jars with buttons! I still am left with tonnes more. I am probably going to list some on my Etsy shop as they are too good to keep for myself!

The collection so far...
If you have any requested, please email me and I'll send you photos to best suit your descriptions.

Happy Making,

Handstitching Workshops Start This Autumn

Preparing for Quilting Classes...

I am really excited about the quilting and hand stitching Workshops that I am teaching in the Autumn here in Derbyshire. 

The programme was launched two weeks ago and I am busy here getting everything ready for the course. It starts on Thursday 3rd October at The Beetroot Tree Art Gallery in the beautiful village of Draycott, five minutes off the M1, J25. Places are limited, so you get the most out of the course.

I love to stitch using colours and texture. This quilt square is to be framed or mounted. The cotton one behind it is less decorative and can be washed
A bit more about the course...

What is a memory quilt keepsake?

You know how we all have bits of fabrics in our sewing boxes that have a special meaning and we want to  keep hold of them? Or we want to create a gift for a big occasion using fabrics and perhaps lace that reminds someone of a special time? Well these memory quilt squares can be made to feature that memory fabric in the middle of the piece. If you want to make the quilt squares with  new fabrics in a pattern that's fine too. The course is inspired by your fabrics and ideas.

How many will I make?

This is up to you and your end design. You need to make two blocks using the Cathedral Windows technique to hold the decorative fabric in the middle. You can make a lot of little ones or  fewer bigger ones. 


What can I make?

Your end design is up to you, as the blocks don't have any seams to stitch up, you can stitch blocks together to make a bag, quilt or frame your precious fabrics for generations to come.

What techniques will we cover?

We will cover the Cathedral Windows quilting technique, hand applique, embroidery and cross stitch, hand fabric printing and beading. It is up to you which techniques you use in your work.
This memory square was inspired by my Wedding dress


For more information on  Workshops visit my website.

 If you have any questions, please contact me samanthaschofield@hotmail.co.uk and I will be happy to help.

I would love to know your quilting stories...

Have a happy Bank Holiday (in the UK)


Last Week On My Instagram

Friday 23 August 2013
I am really loving my time over on Instragram, I am finding so many creative ideas and trends, not to mention the odd very cute cat or puppy.

Last week I...

Packed the cases and...
..took a road trip up North following this amazing Vintage Camper Van..
Opened my jewellery making box post baby to find the case matched my new studio curtains!...

Opened my jewellery case and got inspired to ...


...make a dainty nautical bracelet then book a workshop on bead-making!

 Took a walk to my favourite place, The English Garden at Elvaston Castle, Derbyshire


My instagram is http://instagram.com/samanthajschofield


When The Vegetarian Married The Meat-Eater, Had A Baby...

Wednesday 21 August 2013
..And lived happily ever after...

If you are here for a crafty post, you might want to skip this one...

I have never written about being a Vegetarian on my blog, it is just lifestyle  thing for me, but after commenting on this post by Suzannah http://www.adventuresindressmaking.com , I thought I should let you into our secret.

A few people have said to me, how can a Veggie and a Meat-Eater live together? Well, I will tell you how we do just that.

A lot of things in a married life are about compromise and Mr S said he fell in love with me after having my Princess Pie (a veggie Shepherds Pie). Flattery indeed!

Our new family, on Little L's Christening Day
July 2012

I have been vegetarian for 29 years (since I was 8), doing the maths, that is a long time. As a child I lived in the countryside and didn't want to eat the lambs in the field opposite our house. They would wake me up at 5am one day and the next day they were gone to market. I was upset and that was the big thing that turned me off eating meat, the bond with the animal. In the 1980's it was a big deal but now it is more accepted and I don't get the questions I used to get growing up.

Good time, family get-togethers
July 2013

We were having dinner last night and I was telling Mr.S how Suzannah had turned after 13 years and was reviewing books on bacon joints! This is some turn. For me, I would never go back, but some of my boundaries as a vegetarian have changed since I started living with Mr.S.


All these dishes started out as Veggie options and then I added the meat to them.
Pasta's, tagines, salads, chilli's...

I now cook meat for him, put cold meat in his pack up lunch and include his eating habits into our food shop. I do most of the cooking and shopping as he works long hours. We have a lot of meals that are 50% cooked as a veggie and then 50% for meat or more veggie (adding beans etc).

We have casseroles, he has steaks (I used to work in a pub so I am used to it!), we cook both types of sausages in a Toad in the hole, 50%/50%. Veggie and Non in two separate dishes in the oven. We just don't notice it anymore. It is a way of life. 

I don't eat fish, but he does and I cook this for him as I find it easier than meat. I won't cut up meat, but he cuts it up and I cook it.

As he watches his weight for his sport, he is not a big fatty meat kind of man. But I couldn't let him go veggie for me.


When we had Baby L, this was a hard one. We agreed to meet each other half way and she has fish when she is older she can choose. At the moment this works well for us all.


Little L and Me!
 
I find that a Vegetarian lifestyle gives me a healthy lifestyle, a low cholesterol level and loads of energy! I had a great pregnancy and a even better drug free birth. I put this down to being a healthy person.
 
Everyone finds there own way of being healthy, this is mine.

If you are interested in more information on being Vegetarian contact the The Vegetarian Society

We are off to have a Spag Bol 50/50 for dinner!


Baby Boy Cards 1 Year On...

Monday 19 August 2013
Choo, Choo...

Train Birthday Card
 
 
I can't believe it's a year since I blogged about a new baby in our family and created this keepsake. Now he is one and time has just flown.
 
Baby keepsake
 
 
This little train card was an handmade, project, well how could I of not made a special effort for a first Birthday?
 
Some tricks I picked up to save time...
 
Dye cut cards are easy to come across on the internet or in craft shops. Save lots of time cutting out one.
 
Since I discovered washi tape I have not looked back! The little train motif is stuck on with double sided foam tape to raise it from the card.
 
I covered the plain card in textured craft paper and cut out the details with a spark knife. Any uneven edges where disguised using a stamp pad which was brushed against the edges in a contrast colour.
 
Letraset is fab for simple words on cards and it's super quick. You can place it and just rub it off.It may take a few goes to get the technique right but then you can customise cards and tag in seconds!
 
To add some posh details, I used a foamed backed paper then in a stamp cutter and cut out a few squares to frame the card.
 
Choo, choo to a cutie who is one!


More baby boy ideas you might like, keepsake cards , baby bib and baby cot bumpers .
 
Happy Crafting,
 
Don't want to miss a post? Subscribe to my blog about craftiness, vintage and family life.


Baby Safe Coasters Project Thursday

Thursday 15 August 2013
Now Little L can grab, I have made these oh so simple coasters...


Glass coasters are lovely, but with a little one I find that your drink either sticks to the coaster or they can reach them. They are now unsafe objects in our house. I have a solution! 

I am sure I am not the only Mummy in this position. These coasters are made from oil cloth and table protector. I am using oil cloth from Cath Kidston purely as its a great design and great quality.

So this Thursday I am making this very simple baby safe coaster tutorial.

You will need -
  • Table protector (half a metre is more than enough. You can buy this from anywhere that sells oil cloth)
  • Oilcloth (again half a metre is enough)
  • Sewing Thread
  • Use of a sewing machine
1. Cut out a 3in square of table protector. 
   Cut out the oil cloth on the grain slightly bigger than the    protector.

2. Then cut a small test piece of protector and oil cloth to test your zig zag stitch is right. I use a 100 needle as he's a tough one! The test piece is great as a sewing machine foot support!

   Place the table protector pattern face down and put the oil cloth on top pattern up.

   It is now sandwiches together and your ready to stitch. 

3. Zig zag around the coaster being careful not to touch the sides. Make sure you keep the pieces taught to they don't bulge up in the middle, making your coaster wonky. If you pin it you will get pin marks in the oil cloth.

4. Cut off the thread ends and there you have it...

Coasters you can use around your little one.

Happy Thursday!


N.B. These are not toys, always watch your child around hot drinks

Singer Sewing Machines

Wednesday 14 August 2013
Nothing can sew like a vintage Singer!

Last week, I put a photo of my old Singer hand sewing machine on my facebook page and it had a lot of love over the weekend. It was lovely to see that I am not the only one who finds these old machines amazing!

A bit about this Singer. I got this one for free! Yes, it was free on Freecycle. When I picked it up I felt so bad for taking it, I went and bought the lady flowers and went back the next day with them.

I don't know what the model number is but I have been told that if I take the reference code to my local Singer Sewing Centre they can date it. How cool is that? It didn't have an instruction booklet but it did have some clues in the haberdashery box.

The previous owner (the lady who gave it to me's Mum) had a button hole foot and some loaded bobbins plus haberdashery from the local shop which looked decades old.

It does take sometime to thread up as it doesn't have a light like a modern electric machine but sewing by hand it great. You turn the handle and it makes a very exact stitch. The shuttle is a torpedo which is unusual as my others load into a pre-fixed shuttle case.

I have also to say it is very robust and can take a denim hem easily.

Over the week, I'm going to write a bit more about her. But I wanted to post tonight with a picture of me sewing in my work room.

Thank-you to sewing online for spreading the word!


Nautical Knot Bracelets

Thursday 8 August 2013


I love this really Summery accessory and a treat of a DIY project to make...

I have a stash of crafting wire and I was thinking what to do with it when I saw this really cool project on Etsy for a DIY nautical knot bracelets . The tutorial is for a much chunkier bracelet for the beach but I think it works for a daintier version in pastel shades and a silver fastening. 

My finished bracelet
I would love to see your knot bracelets, send me a tweet or instagram #createitsamantha

Happy Crafting,