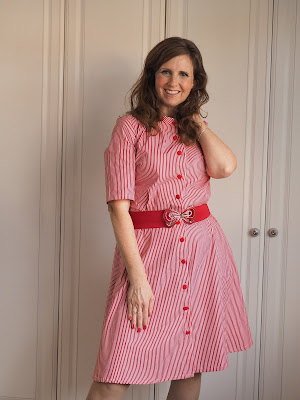
My Eco Christmas Candy Cane Simplicity 8014

Wednesday, 15 November 2023


The day after bonfire night (5th Nov) I was on it with Christmas sewing! This is my latest sew for Minerva.com and you can read all about it here .


I wanted to make a eco/non sparkly dress for the festive season and I thought that the candy cane idea would work after seeing this stripe fabric on the Minerva website. Sequins I read are really bad for the planet and as my daughters love a sequin, this year I thought I would opt out.

Another reason for the cotton dress is I also get so hot running around in the house when we have guests and a cool fitting, easy to wear dress with a nod to the 1940s looks a solution. Nothing slinky for me, especially when you have to pick up kids and running about. If you know, you know. Watch my video  on my sewing plans, as you can tell from my voice I was excited about this project.


I have to say, I am so pleased with this make, the fit and the style. The fabric was lovely to stitch and so soft and not at all scratchy. Just bliss to sew, I love to sew a cotton and this one is lovely.


If I was so sew this again, the only thing I would change is the hem and make it slightly longer. I used 3.2m of fabric and it was perfect. I have just a little bit left for a Christmas bag or something.


I love the belt (from New Look ages ago) I think the statement belt adds to the look. The buttons are vintage from Bianca. Go and check out her insta she is fabulous and so talented.


The link to this beautiful fabric is here  if you fancy making a Simplicity 8014 yourself. The fabric was gifted by Minerva in exchange for a review in my own words.

What other eco friendly dresses can I make for Christmas? Do let me know...

Best Wishes,

Samantha xx

Butterick B6175 Simple Sleeve Hack

Tuesday, 17 October 2023


 With the change of seasons, I get the need to make my dressmaking patterns fit the weather. This means shortening the sleeves, changing a necklines and making tops into dresses and vice versa. Anyone with me?

 I bought Butterick B6175 this summer as a basic pattern block for a woven blouse style top. I have so many knitted top patterns and a stash of beautiful cotton prints needing a sewing pattern. I was also looking for a quick make out of a metre of fabric (as I can't help myself buying a metre of a pretty fabric).


I loved this pattern as it has five..five! variations and even though they are all short sleeved, it is so easy to extend the short sleeve to a long. Winner!


For this top, I spied this Art Gallery remanent at Sewing B in Stapleford nr Nottingham. I loved the sunflower print and they didn't have it on the roll, they sold me three pieces for £3 and I was determined to make my sunflower top out of them! And I did...

The fabric is Art Gallery fabrics which are so beautifully soft like a Tana lawn with a gorgeous soft brush. I would guess I needed a metre if it was sold off the metre and you know what I use all the fabric. 

I made view B with the sleeve of view C and added on a hack to the sleeve. I love the fit of this blouse top, I cut a size 12 and it fit great. I like that it has two darts at the front and cute fastening at the back.


The back fastening was just a button with embroidery thread loop on an open placket. 


My sleeve hack was the favourite part of this make, and this is how I did it. 
I took two pieces of fabric 45cm square and hemmed on edge and added a double long running stitch on the other so they could ruche up and make floaty mid length sleeves.


And the dress matches the sunflowers I've been growing this Autumn in the garden. 


I'm looking at making this style now in heavier weight fabrics for the winter months and adding a double button at the back so it's not as open.

Have you made this pattern and have the added a little hack?

Happy Crafting,

Samantha x

Favourite Summer Sewing Hack From McCalls 7381 and 8036

Saturday, 20 August 2022

 Hi There,

I hope this crazy warm Summer is being kind to you? I wanted to share a dress hack I have been wearing on repeat ever since I made it in June this year. It's my last make for Minerva Crafts and the link is here.


Its McCalls 7381 and McCalls 8036 hacked as my sketch from a dress to a two piece. If you are thinking of getting more wears from your dresses ...do this! I'm using the bodice and skirt of  McCalls 7381 aka #sashamccalls and the sleeves of 8036.

Here are some photos and thank you to Minerva for selecting me to make this gorgeous fabric up in exchange for a review...


I hope this has inspired you to take your dress patterns and make them into skirts and tops, its been a great experiment and I've worn both as a skirt with a tshirt and blouse with jeans loads!!

Happy Crafting,


Samantha


My Sureau Dress Hack

Wednesday, 15 December 2021


 Hi,

It's time for Christmas makes and I really love this hack I have done for Minerva as a Brand Ambassador. 

I have taken the Deer and Doe Sureau dress and made it into a tunic with wider sleeves. You can read how I made the sleeves on trend and wider here.

I will be wearing it to nativity and playgroup Santa meets this week with my girls. Here are a few photos...


What are you making for Christmas?  I would love to hear! 

Season's Greetings, 

Love,

Samantha

My Bloomsbury Blouse Hack For Minerva

Tuesday, 6 April 2021


My latest make is live on Minerva. Read how just three simple hacks turn the Bloomsbury Blouse into a retro dress.

This georgette fabric is beautiful. I can't wait to wear this dress more. I made it for Easter weekend and I'm sure it will great for drinks and meet ups this Summer.

Thank-you Minerva for sending me the fabric with no agreement to share on my blog, but it's so special I had to!

Here are some more photos...


Sam x

My SOI Zoe Dress For Christmas

Saturday, 28 November 2020

Happy Saturday, 


I've just finishing the beautiful Zoe dress for the new Minerva site   in brocade fabric.  Read my review on this pattern and how I used brocade fabric (shh! it isn't very tricky ). I love way it drapes and beautiful Christmassy pattern. 

My review is here and whilst you are there do have a look at the shiny new site. Minerva have created  a creative platform, it's easy to shop and interact with other crafters. A great way to meet new new friends to support your creating.

The fabric and pattern were kindly gifted by Minerva for their site. 

Here are a few photos if you are inspired to make this dress -


Happy Sewing,

Love, 

Samantha x

Why I Love Simplicity 8292

Monday, 19 October 2020


Hello,

My latest Minerva Blogger Network post is live and |I'm thrilled to share this gorgeous baby cord dress. 

Read how I made Simplicity 8292 in a few evenings, it has a brilliant fit and the baby cord it so soft. Why stop wearing your favourite colours just because the season has changed?


I'm thinking of wearing this dress with leggings and flats this Autumn and with a long sleeve top under the dress so it's like a pinafore. I love the sleeves and they feel so feminine and floaty.


Happy Crafting,

Samantha x


Personalising My Cross Stitch With The Folklore Company

Thursday, 18 June 2020


I love cross stitch and to have my own unique kit arrive in the post was so exciting. I designed it using software from The Folklore Company . I opened the kit and there it was everything I needed; aida fabric, embroidery threads, needle and a pattern. This blogpost is a review of the kit.


I decided to use a quote from Jackie O so I can hang up my finished piece in my little girl Pearl's room. Pearls are always appropriate aren't they? I used an embroidery hoop to stretch out my cross stitch (aida) fabric, found the centre of the fabric and off I went. 

The process to create my own design was really easy on The Folklore Company's website. I chose my colours and had a series of templates to choose from to get started, I created my design in about half an hour, pressed OK and within two weeks I had the kit on my doorstep.


I liked that I had two cross stitch charts  (colour and symbols) in the kit plus a web link to my design too. I decided to flip the colours when I received the kit and have the dark pink as the border motif. I really like this.


The kit took six evenings to finish and I found it so relaxing. It was something to look forward to at the end of the day. I sat down with a cuppa and got my stitching out and watched it grow.


I really loved this design, it looked very Nordic. Stitching with just two colours is perfect for beginners or if you want a simple project. The threads were DMC, which are beautiful and shiny. I still have over three quarters of my skein of threads so I could easily make the kit again if I bought some more fabric.


I want say a big thank-you to The Folklore Company for sending me my own personalise kit to stitch in return for an honest review. I really enjoyed the whole process and now the piece is now waiting for a frame when I can get to the shops!


Let's Make VE Day Bunting

Thursday, 30 April 2020


In these very unique times, let's make some bunting and celebrate VE day at home...

At the moment, I'm home with both my girls and we are looking at crafts that are easy and fun to do in a few hours. Today I'm sharing a easy child friendly craft which you can do with materials in the home and a bottle of textile glue.


Making the bunting flags

·    Make a template. To do this, get a piece of paper and fold in half. Then draw a triangle from the top unfolded edge of the paper to the bottom folded corner. Unfold your paper to get a flag. 

     To cut out your flag, line up the top edge of your flag to the edge of the fabric. You want your flag to hang straight, if you cut your flag on the diagonal or ‘on the cross’ your flag will hang with a twist! You can trace around your template with a pencil.


     Cut out your flags using your template, ideally with pinking shears so the flags won’t fray.


You can attach your flags to a ribbon or string with textile glue or thread them using a sewn channel.


If you want to create a channel and thread your flags, stitch the channel at the top of the flag turn over once to give a 2cm channel and stitch. Thread in the loose threads and trim off excess fabric and threads.  


You can stitch the channel with a sewing machine or if you don't have a sewing machine you can use a hand stitch. Make sure you fold the edges in to stop it fraying. You can then thread your bunting flags onto a ribbon or string. If you thread your flags on, you can rearrange these when you fancy.


You can make and decorate your flags using old pieces of fabric in the home. Use up old tea towels and duvets. if you don't like the pattern but like the colour, cut up the fabric to make letters, shapes and dates. Use your textile glue to glue the shapes onto your flags.

I really enjoyed making this bunting and I hope you can to. Share your makes with the hashtag #crafternoonteas on social media.

Stay safe,

Sam x